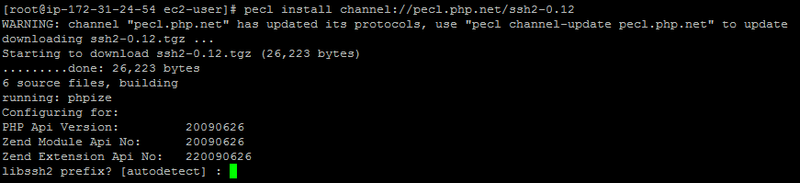
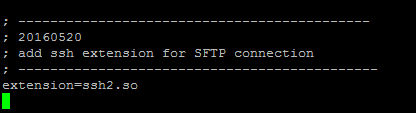
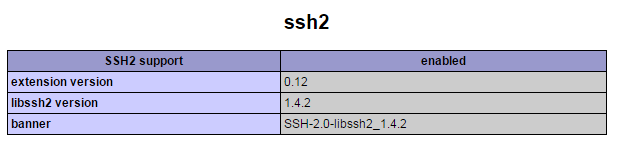
(AWS-學習-09) --- 安裝 PHP SSH2 Extension
STEP 1: 安裝 PHP-DEVEL

STEP 2: 安裝 gcc

STEP 3: 安裝 SSH2 函式庫

STEP 4: 安裝 make

STEP 5: 安裝 pecl

STEP 6: 使用 pecl 編譯 ssh2.so 檔
STEP 7: 修改 PHP.ini 增加 ssh2.so 的支援
STEP 8: 使用 phpinfo() 檢查
(Python-學習-08) --- Python 類別
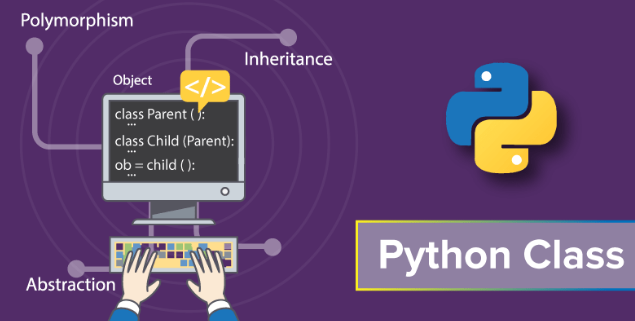
類別簡介
類別定義的形式如下 :
class ClassName:
    <statement-1>
    .
    .
    <statement-N>
類別建立後,Python 提供兩種方式使用類別的內容 直接引用 或是 產生物件 。
直接引用
則 MyClass.i 和 MyClass.f 是有效的引用,同時呼叫 __doc__ 會回傳類別的說名字串。
class MyClass1:
    """A simple example class"""
    i = 12345
    def f(self):
        print("Hello MyClass1")

print(MyClass1.__doc__)
print(MyClass1.i)
MyClass1.f
輸出 :
A simple example class
12345
產生物件
另一種方式是,先依據類別定義產生物件,然後再對物件進行呼叫。同時若此物件有實作 __init__()
則產生物件時,會先執行 __init__() 中所定義的程式。
class MyClass2:
    """A simple example class"""
    def __init__(self):
        self.i = 67890
    def f(self):
        print("Hello MyClass2")

class MyClass2:
    """A simple example class"""
    def __init__(self):
        self.i = 67890
    def f(self):
        print("Hello MyClass2")
    def v(self, input):
        print("Input = {0}".format(input))

x = MyClass2()
print(x.__doc__)
print(x.i)
x.f()
x.v(22)
輸出 :
A simple example class
67890
Input = 22
從 MyClass2 中的函式,值得注意是 self 這個關鍵字,由上面範例中,我們呼叫 x.f() 並沒有帶入參數,但是明明 def f(self): 就有定一個參數 self 。 事實上,使用 x.f() 相當於 MyClass2.f(x) ,所以我們之後會看到每個 method 的第一個參數一定是 self 。
Class 中的參數
在 Class 中所定義的參數,會被所有的 Object 使用,但是 Object 定義的參數,只會被 Object 本身使用。
class Dog:
    kind = 'canine'  # Class 參數,被所有 Object 共用


    def __init__(self, name):
        self.name = name  # Object 參數,只會被 Object 本身使用


d = Dog('Fido')
e = Dog('Buddy')
print(d.kind)
print(e.kind)
print(d.name)
print(e.name)
輸出 :
canine
canine
Fido
Buddy
繼承
繼承形式如下:
class DerivedClassName(BaseClassName):
# 另一種寫法 class DerivedClassName(modname.BaseClassName):

    <statement-1>
    .
    .
    .
    <statement-N>
子類別可以使用 BaseClassName.methodname(self, arguments) 方式呼叫父類別的method 另外,Python還提供兩個好用的工具: – isinstance() 用於檢查 class 類型,若物件類型與Class相同,則回 True – issubclass() 用於檢查繼承,若某一 Class 是繼承,則回 True
class Animal:
    def base(self):
        print("Animal")

class Cat(Animal):
    def show(self):
        Animal.base(self)
        print("Cat")

c = Cat()
c.show()
print(isinstance(c, Cat))
print(isinstance(c, Animal))
print(issubclass(Cat, Animal))
print(issubclass(bool, int))
print(issubclass(float, int))
輸出 :
Animal
Cat
True
True
True
True
False
多重繼承
Python 支援與 C++ 相同的多重繼承,這樣讓我們會少寫很多code,記得 Java 要做多重繼承還需要先定義 interface 等。
class DerivedClassName(Base1, Base2, Base3):
    <statement-1>
    .
    .
    .
    <statement-N>
私有參數
Python 語言沒有定義 private member 或是 protected member ,因此大多數 Python 程式,會有個變通的方式, 若我們將一個參數前面加上2個底線,例如 __spam,則該參數會被視為 private member
class Mapping:
    def __init__(self, iterable):
        self.items_list = []
        self.__update(iterable)
(讀書心得) --- Intro to Growth Hack
一堂大神的神功灌頂的課程
經過鄉民暴動後終於搶到 Xdite 老師的票,今天因為處理一個bug到六點,才匆匆從新店趕去聽老師的演講,今天的重點之一是 Landing Page,所以我也嘗試依照老師說明的 Landing Page 結構寫一篇心得文。這圖是借用老師的FB 形容課程的熱門程度,真的非常貼切。

上課的好處
1. 可以學習到 Growth Hack 主要精華
老師有很多的實務經驗,所以能夠將許多 Growth Hack 技巧,例如: Measuring, Landing Page, A/B Testing用兩句淺顯易懂的話貫穿 : – 降低客戶疑慮 – 增強客戶信心
同時,老師也舉很多實務上的例子來說明一些理論,範例包括: 矽谷知名好網站,不好的網站,連日本的燒肉店都可以成為課堂中的教材,讓我知道這門學問,不只應用在網路行銷,實體店面也需要 Growth Hack,下次去日本一定要好好考察一下。
2. 可以學習到 Growth Hack 好用的工具
老師直接幫我們推薦許多好用的工具,之前還煩惱這些工具要怎麼去找 open source library,怎麼自己刻,沒想到已經有需多好用的工具,而且因為老師直接推薦網站,所以也省去要如下 Google 關鍵字的煩惱。光是第1,2點這堂課就物超所值了。
3. 美味的便當
雖然在課堂上可以用餐,但是希望自己可以專心聽課,所以先將便當放到課後享用,沒想到中場休息,還有好吃的點心還有咖啡。結果便當還是沒機會吃,到下課後才在附近找間7-11吃便當,想想今天的課程後才滿足的回家。 🙂

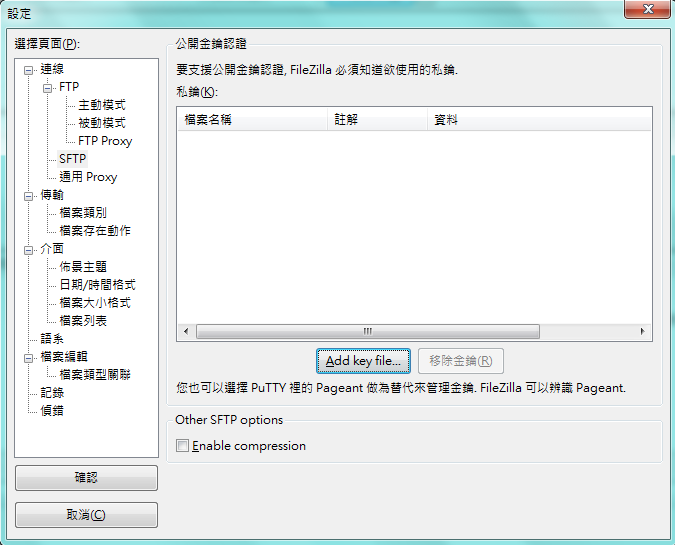
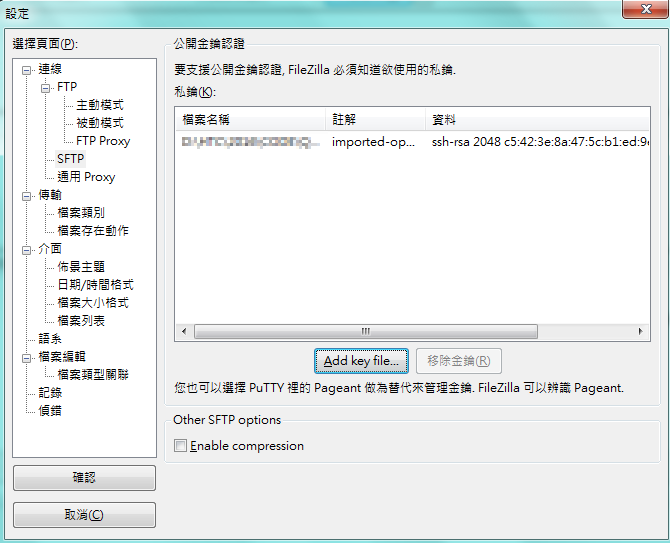
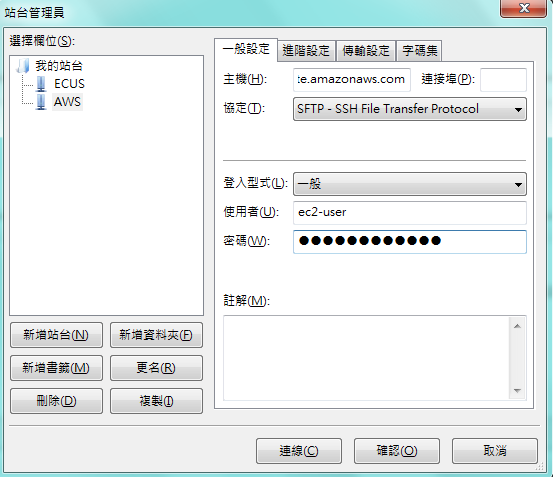
(AWS-學習-08) --- 使用 SFTP 傳送檔案到 EC2

(Python-學習-07) --- Python Exception

異常處理
Python 提供 try – except 異常處理功能,try- except 語句可以帶有 else 語句, else 主要是執行若沒有發生異常時的程式碼。
import sys
try:
    f = open('myfile.txt')
    s = f.readline()
    i = int(s.strip())
except OSError as err:
    print("OS error: {0}".format(err))
except ValueError:
    print("Could not convert data to an integer.")
except:
    print("Unexpected error:", sys.exc_info()[0])
else:
        i = i + 10
      print("Open file successs.")
在異常語句中,我們可以為 except 語句指定一個變數,用來傳遞異常相關參數。
try:
    raise Exception('spam', 'eggs')
except Exception as inst:
    print(type(inst))
    print(inst.args)
    print(inst)
    x, y = inst.args
    print('x =', x)
    print('y =', y)
輸出 :
<class 'Exception'>

('spam', 'eggs')

('spam', 'eggs')

x = spam

y = eggs
拋出異常
使用 raise 強制拋出異常。
try:
    raise NameError('HiThere')
except NameError:
    print('An exception flew by!')
    raise
輸出 :
An exception flew by!
Traceback (most recent call last):
  File "C:/Users/ALLEN/Documents/Python/Basic/Except.py", line 12, in <module>
    raise NameError('HiThere')
NameError: HiThere
用戶自定異常
我們也可以先建立一個 exception 的 calss ,然後拋出我們定義的異常
class MyError(Exception):
    def __init__(self, value):
        self.value = value
    def __str__(self):
        return repr(self.value)
輸出 :
try:
    raise MyError(2*2)
except MyError as e:
    print('My exception occurred, value:', e.value)
定義清理行為
try- except 語句還有一個可選語句 finally 無論是否有發生異常,finally 語句一定會被執行。常見的應用是在釋放資源 (例如 file close)
try:
    file = open("test.py")
except:
    print('Read file error')
finally:
    file.close()
另一種用法,可以使用 with 語句。
with open("myfile.txt") as f:
    for line in f:
        print(line)
(AWS-學習-09) --- 安裝 PHP SSH2 Extension

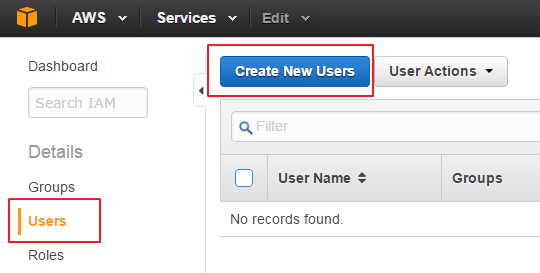
(AWS-學習-06) --- 建立 IAM 帳號
使用 AWS 建立權限管理系統幫助不同同事使用 AWS 雲端服務。
STEP 1: 進入 AWS IAM 網頁
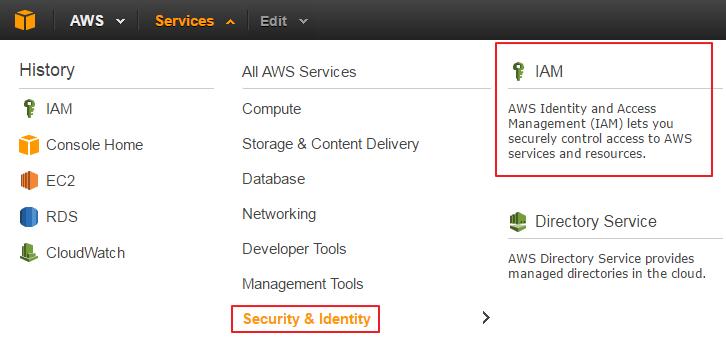
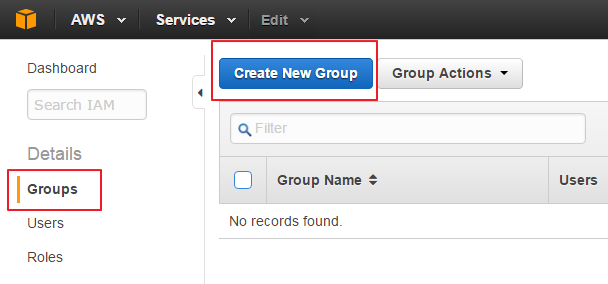
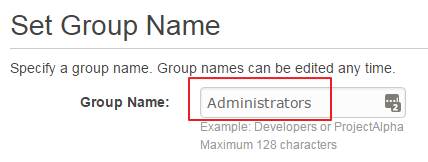
STEP 2: 建立權限群組 (例如 Administrator)
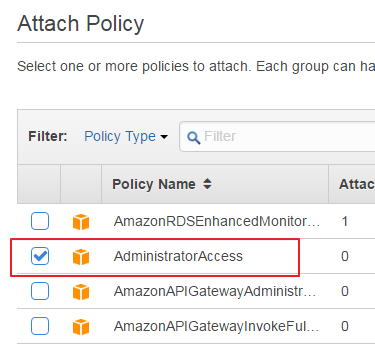
STEP 3: 使用內建的權限 template 套用到 Administrator Group
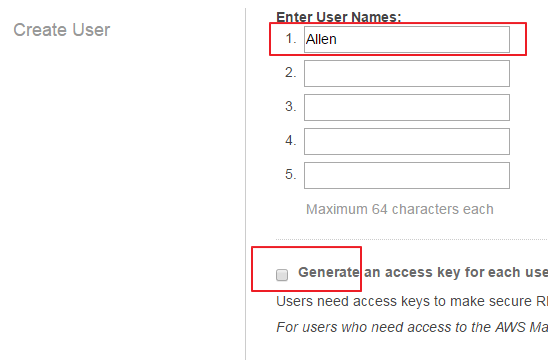
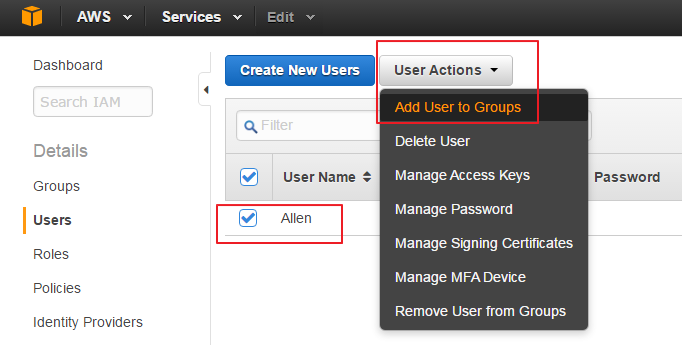
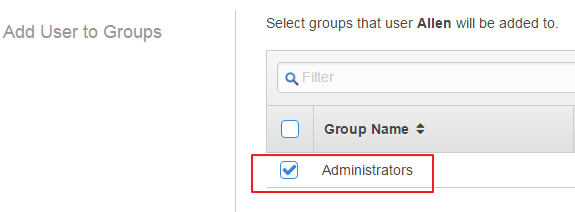
STEP 4: 建立使用者,並且指派到對應群組中
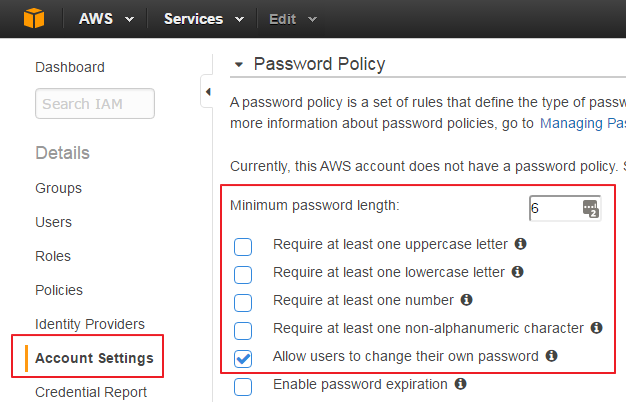
STEP 5: 設定密碼規則
STEP 6: 使用專屬登入網頁登入
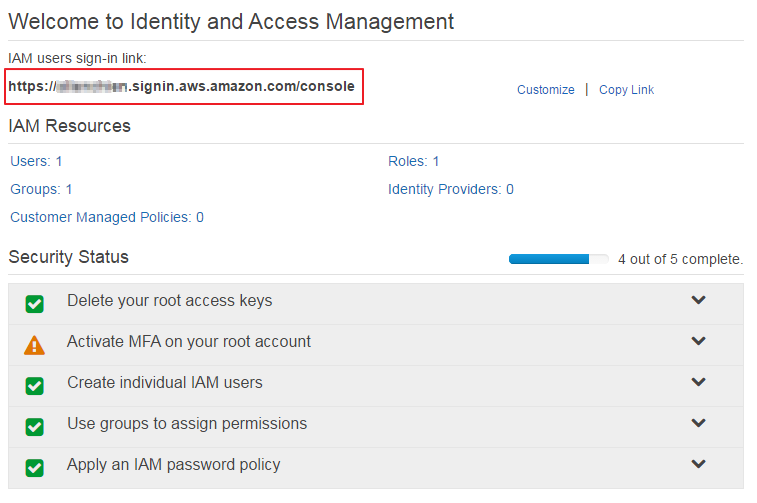
例如: https://xxx.signin.aws.amazon.com/console 登入後顯示下面畫面
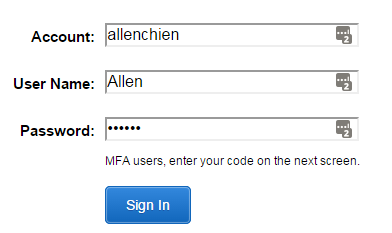
STEP 7: 使用 Administrator(Allen) 的身分登入了

(Python-學習-06) --- Python 輸入與輸出
在Python中,有時會需要列印出一些內容方便顯示與除錯。因此Python提供兩種格式化輸出方式
- 先將字串格式化,在使用print()印出
- 直接呼叫 format()
字串格式化
Python可以使用 repr() 或是 str() 將其他資料型別轉為字串型別
s = 'Hello, world.'
str(s)
repr(s)
str(1/7)
x = 10 * 3.25
y = 200 * 200
s = 'The value of x is ' + repr(x) + ', and y is ' + repr(y) + '...'
print(s)
hello = 'hello, world\n'
hellos = repr(hello)
print(hellos)
any = repr((x, y, ('spam', 'eggs')))
print(any)
輸出 :
The value of x is 32.5, and y is 40000...
'hello, world\n'
(32.5, 40000, ('spam', 'eggs'))
使用str.format
另一種方式,使用上有點類似 C# 方式
print('{0} and {1}'.format('spam', 'eggs'))
print('{1} and {0}'.format('spam', 'eggs'))
print('This {food} is {adjective}.'.format(food='spam', adjective='absolutely horrible'))
print('The story of {0}, {1}, and {other}.'.format('Bill', 'Manfred', other='Georg'))

import math
print('The value of PI is approximately {0:.3f}.'.format(math.pi))

table = {'Sjoerd': 4127, 'Jack': 4098, 'Dcab': 7678}
for name, phone in table.items():
    print('{0:10} ==> {1:10d}'.format(name, phone))
輸出 :
spam and eggs
eggs and spam
This spam is absolutely horrible.
The story of Bill, Manfred, and Georg.
The value of PI is approximately 3.142.
Jack       ==>       4098
Dcab       ==>       7678
Sjoerd     ==>       4127
檔案的讀入與寫出
檔案開起使用 open() 完成,範例如下:
f = open('workfile.txt', 'r+')
print(f.readline())  #一次讀入一行

print(f.readline())
print(f.readline())
print(f.read())  #讀入全部檔案


print(f.write("\nwrite1"))
print(f.write("0123456789abcdef"))
f.seek(5)            #移到第6個元素

print(f.read(1))     #讀一個元素

print(f.read(1))
f.close()
輸出 :
write10123456789abcdefine1
line2
line3
end


write1
write1
write1
write10123456789abcdef
write10123456789abcdef
write10123456789abcdef
7
16
t
e
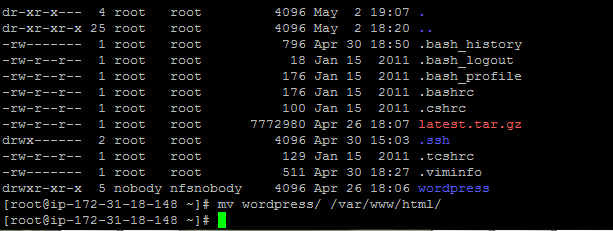
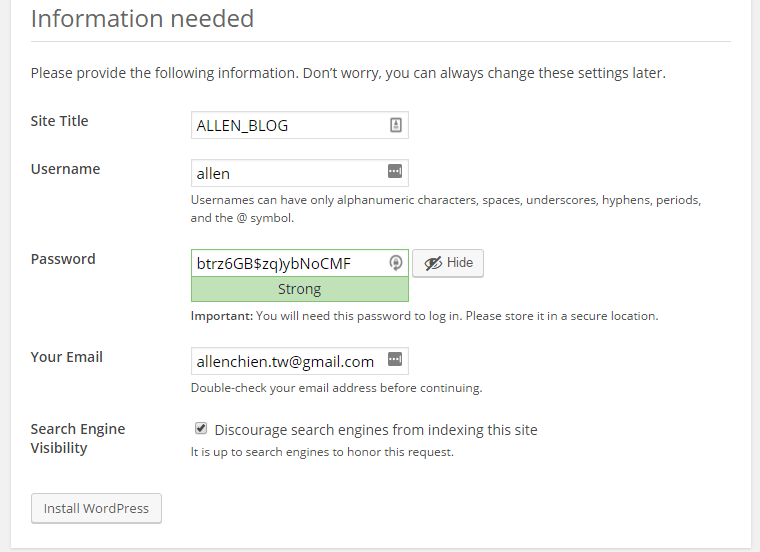
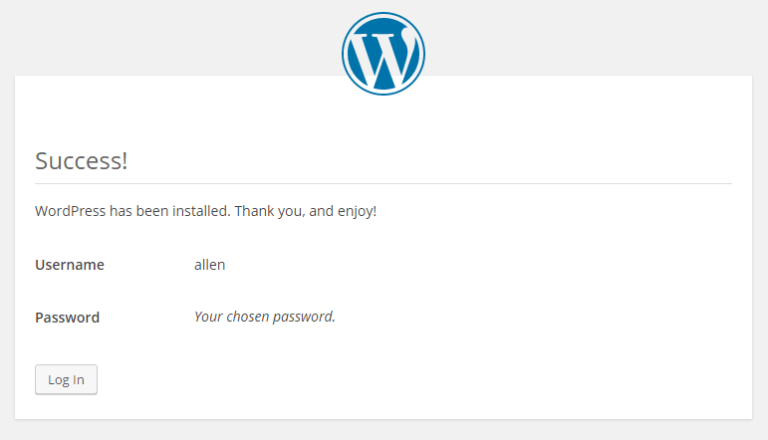
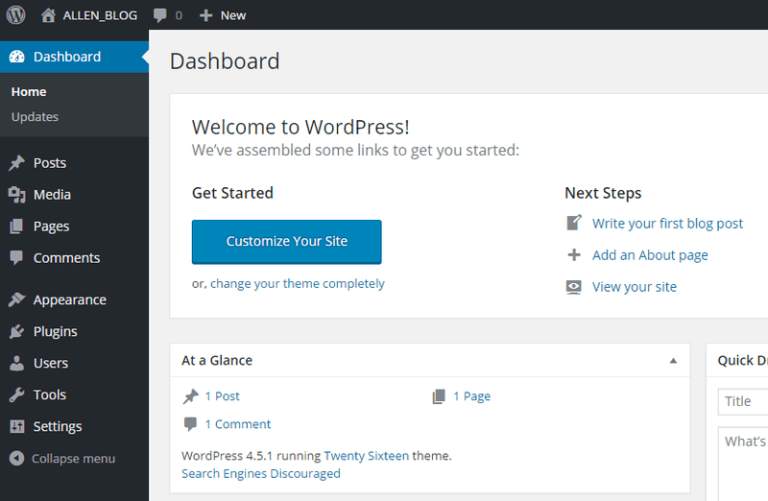
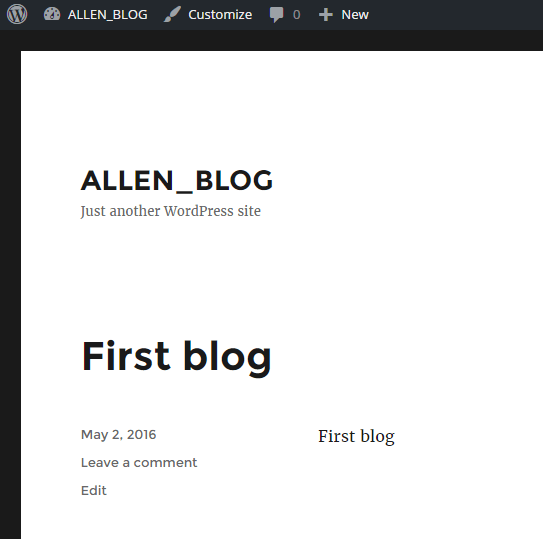
(AWS-學習-05) --- 建立 WordPress 網站
下載 WordPress

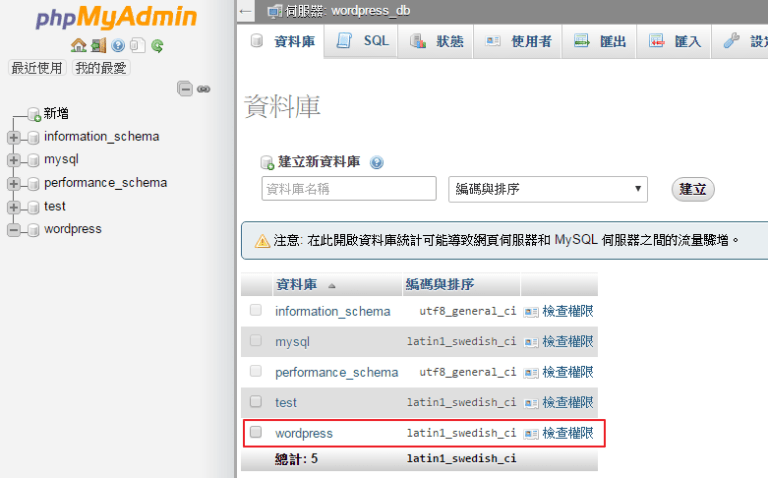
利用 PhpMysqlAdmin 建立 WordPress 資料庫
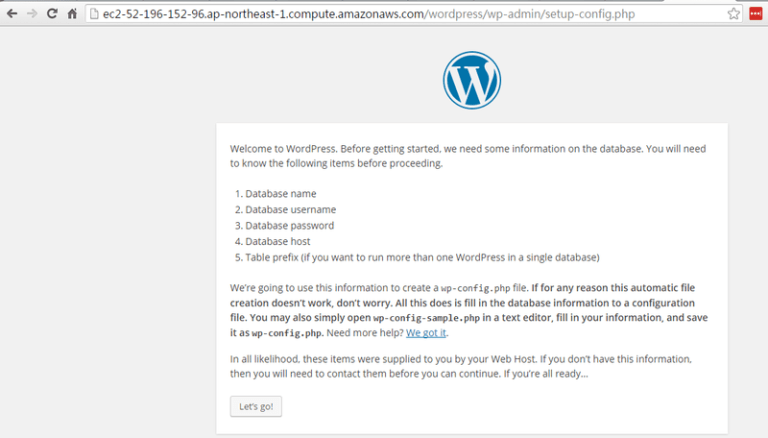
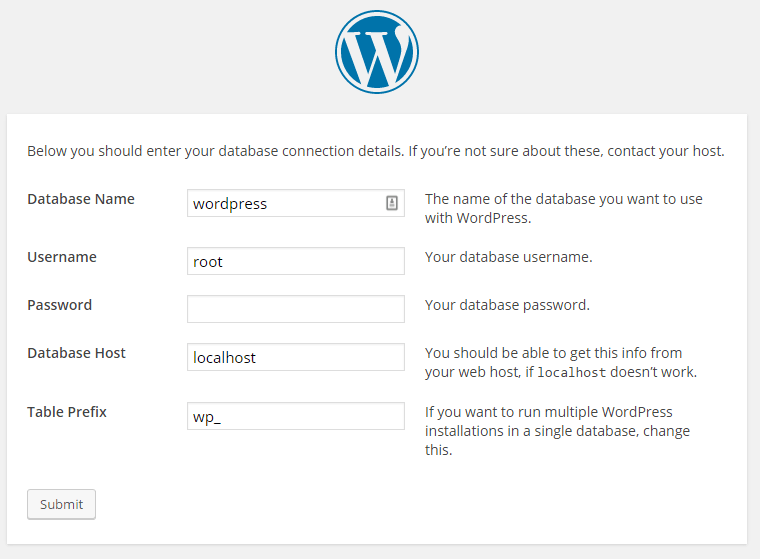
開始安裝 WordPress

開啟 WordPress 後台介面
完成
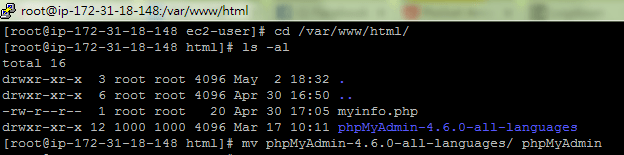
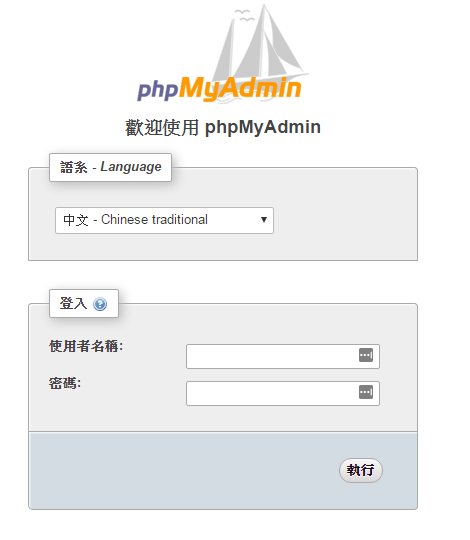
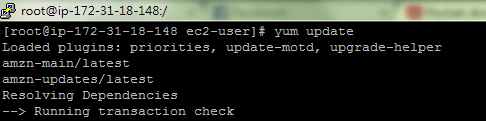
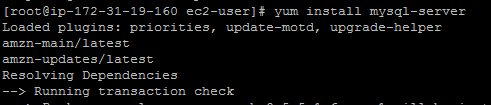
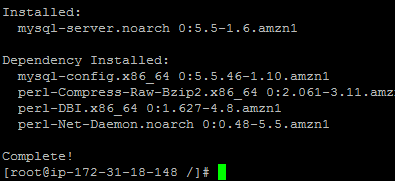
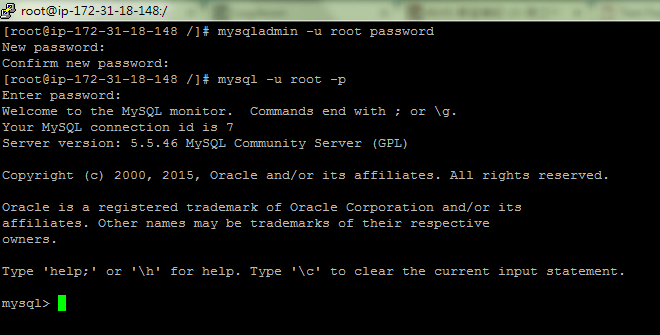
(AWS-學習-04) --- 建立 MySQL + PhpMysqlAdmin
安裝 MySQL
確認 MySQL 版本

啟動 MySQL


安裝 PhpMysqlAdmin